Friday, May 11, 2012

How to build a garden planter from wood pallets.

Okay, so I had some time this week so I decided to tear apart a couple of broken up wood pallets and build myself a garden planter box.  This is how I did it.


Things you need:

  • Wood pallet(s) – depending on shape of the pallets will determine how many you need.  As you see in the picture, my pallets were pretty broken up so I need to use 2 of them.  I chose one that had 3-4 inch boards and one that had 6 inch boards so I could alternate the different widths on the planter. 
  • 1 ¾ inch deck/wood screws or nails – that all depends on you.  I prefer to use the deck screws mainly because it is faster.
  • Cordless power screw driver and a wall charged battery or hammer if you decide to use nails instead of screws.
  • Pry bar to dismantle wood pallet(s)
  • Electric or manual sander
  • Sand paper – I used 60 grit, but any will do as you will only be lightly sanding.
  • Hammer
  • Landscape paper
  • Staple gun and staples
  • Miter saw

Steps:

  • Using your pry bar and hammer, dismantle the wood pallet(s), separate usable boards and non-usable boards.  Then separate support boards (usually 2 x 4’s) from planks (usually 1x3, 1x4, or 1x6).
  • The 1 x 3 and 1 x 6 boards I used were in lengths of 36”, I kept 4- 1x3” and 2- 1x6” in that length for the sides.  I cut, using a miter saw, 4-1x3” and 2-1x6” into 20” lengths for the sides. 
  • For the corner supports, I used some 2x2 strips that I had in my scrap pile but you can use the support boards (usually 2x4) from the wood pallet.  I had laid out 2 – of the 1x3 or4” and 1 of the 1x6 out next together and measured to obtain the height of the box and then measured and cut 4 corner supports to that length.
  • I then used an electric sander and 60 grit sandpaper to lightly sand all pieces, just to make sure there wasn’t any rugged spots on it.  If you sand too much, you sand off some of the natural wear of the boards off and I wanted to keep that rugged worn look. 
  •  I started with the sides, I took 2 of the corner supports, laid them out, then 2 – 1x3” and 1 – 1x6” all 36” in length, alternating them….thin, thick, thin. Laid them on the corner supports making sure ends of the boards were flush with corner support.  Then I screwed them to the corner supports. Do this one more time for the other side.
  • Then I took the 20” length boards and attached (using screws) them to the corner supports that are attached to sides in the same matter as the sides…thin, thick, thin.  Do that for both ends.  When you are done with that it should look like a box without a bottom.
  • This is where I used landscaping paper, cut out enough to cover bottom with about a half inch extra all the way around. 
  • Fold the paper a half inch and staple to the box.  The paper will keep weeds out and allow for moisture to drain out. 

This picture shows the final product.  In this picture I haven’t filled it with any goodies yet but I used plastic pop bottles on bottom layer for drainage.  Then mixed regular soil from the ground with compost with manure, then filled the rest leaving about a third of the box not filled.  I chose to plant onions in there but you can plant whatever you want to.  If you are planting flowers I would use potting soil as it is less dense and will have better draining.

Monday, April 23, 2012

How to make homemade laundry detergent....

A co-worker of mine had been talking about how she was starting to make her own laundry detergent.  I guess I had never really thought of doing that but when we started talking more I decided to look into it.  For me, the interest was mainly on the cost effectiveness of it.  We are a family of 5 and laundry is a constant in our house and it can get quite costly.  I still had a lot of questions, does it whiten clothes, how is the smell, is it hard to make. So being intrigued I decided to research it.  What I had found out was enough for me to try it. 

The money saved a lone by making it yourself was the biggest attraction to it.  The cost is fractions of what brand name detergent is.  Most of the research I found had compared the effectiveness of the detergent to brand name detergents and the results were almost identical.  Then the question about scent, there are essential oils that can be added if you choose to but it many cases the bar soap you add may have enough of the good smelling stuff everyone likes.  Also, it appears to be rather easy to make, you can either keep it in powder form or make it into a liquid.  I personally think I will leave it powder form to start with.  But maybe will dabble with the liquid form in time. 

Below is a list of ingredients needed and how to make it.  I have yet to make a batch but wanted to share with you what my research had found.  I am excited to try this and will definitely will be posting again once I have made it and give it a whirl. 

Now where to find the supplies, there are 3 ways for someone to get a hold of the products.  It all depends on where you live and what you have available.  The first way is to obtain it from stores.  Most stores like walmart, target, etc. will have the products.  Your local hardware store might, but you would have to check.  The second way, is online shopping and my favorite online store is Amazon.com  http://www.amazon.com/?_encoding=UTF8&tag=thehandwomaji-20.
  They make it easy because you just have to type it into the search plane.  And the third way would be to borrow from someone that would be willing to give you some to try…lol.  I feel that you will love this so you might as well get it yourself.  

After I make a batch myself, I am going to break down the cost analysis personally for me.  For things that I have researched, the best cost ratio was about $7:312 loads….now that is a great deal.  But for myself I want to break it down with how I use it.

So check out a few things and give it a whirl, I know I am….


Here’s the breakdown of the ingredients in homemade laundry detergent and their function:

Bar Soap – The most crucial ingredient, soap gives the detergent its cleaning power. DIYers recommend several brands to use in homemade detergents, including Kirk’s Castile, Dr. Bonners, Fels Naptha or Zote. These last two are marked laundry soap and work very well in homemade detergent.

Borax – Also known as sodium borate, borax is a naturally occurring mineral that acts as a whitener and deodorizer.

Washing Soda – not to be confused with baking soda (sodium bicarbonate), washing soda is sodium carbonate, also known as soda ash, and it helps to remove dirt and odors.

Fragrant or essential oils – you can add some of your favorite oil essence to give a nice fragrance to your detergent. Recommended amounts are one to two ounces per load. Tea tree oil has the added benefit of acting as a disinfectant, so it’s great for washing cloth diapers, hand towels or linens from a sick family member.

Powdered Laundry Detergent
1 bar of soap
1 cup borax
1 cup washing soda

Use a grater to shave the bar of soap into small flakes. Mix well with borax and washing soda until you achieve an even, fine mixture. Store in labeled, air-tight container. This recipe makes approximately 32 ounces of detergent; use one to two tablespoons per load depending on size.

Liquid Laundry Detergent
1 bar of soap
1 cup borax
1 cup washing soda

You’ll also need a grater, a medium sized pot, five-gallon bucket and some water.

Use a grater to shave soap into a pot. Add two cups water, turn heat to low, and mix until combined. Remove pot from heat and set aside. Pour borax and washing soda into bucket and mix. Add soapy water from pot and mix quickly and thoroughly. Add enough water to fill three-quarters of the bucket, and continue stirring. Allow mixture to set overnight. Use one-half cup for small loads or one cup for large loads

Wednesday, April 18, 2012

DIY, how to complete a fire pit....

Okay, so I posted our fire pit on here earlier.  I have now completed the area with some more DIY projects.  In the below pic is what the completed area looks like.  I love the rustic imperfect style of it.  All of the items were either something we already had or made from materials that were around the yard. 


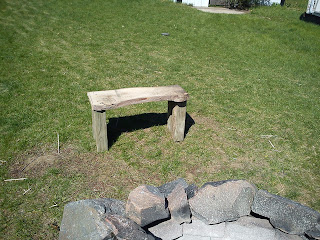
Let me explain the above pic a little bit.  You have already seen the fire pit.  That is made of brick and river rock.  Then I have the glider bench.  This was my mom's and she had put it in on her thrift sale so I bought it from her.  It was painted/stained brown.  I sanded it down and loved that I didn't get all of the old stain off and decided to keep it the way it was and just sealed it with polyurethane to protect it from the outside elements.  On the end of the bench are 2 log blocks.  One taller and one shorter.  These were in the backyard as this property use to have a wood stove for heat.  They make great end table or drink holders.  There is also a solo stump that is used for seating.  It was perfect size for one of the kids to be able to sit on.  However, it was charred as someone must have tried to burn it in a fire before.  I chipped off what char I could and then for the seat I traced and cut out a mock cover out of some scrap luan board we had.  This way someone can sit on it without getting the char on their britches.  The outdoor elements will eventually discolor the cover and it won't be so bright.  Then finally are the 2 little benches.  I made these all out of scrap wood.  Below is a closer pic of one of them.


With these there were some old 4x4 posts that were on the fence that had broke off.  I cut them to size (15 inches) and attached them using 2 3/4" wood screws to a piece of wood that was cut out of a tree at one time and made into planks.  I cut this plank to 26" in width.  I have several of these planks around the yard and cannot wait to make something else with them.  These are very simple but had that touch of rustic that I wanted.  Plus, they are very mobile and can be removed when mowing and if not quite close enough to the fire to make those oh so awesome s'mores. 

I have mention this before but I absolutely love making functional items out of scraps or "trash".  Recycling or repurposing has become a large part of my life and I am absolutely loving it. 

Monday, April 16, 2012

DIY, how to recycle wood pallets into a trophy/medal stand...

My latest project….a trophy/medal stand for my daughter’s awards.  It is made out of a broken wood pallet.  It was actually pretty simple to make.  I found a pallet in my stash that would work perfectly.  All I had to do is add one board that was missing that I needed.  The other missing ones was perfect because I didn’t want or need them there.  Then I removed all old nails in it.  I made shelves by cutting boards off of other pallets to size and placing them on top of front and back boards.  I did that on the bottom, top and one in the middle.  Then I rough sanded the whole thing good enough so it would take stain.  I used ebony colored stain so it would be real close to black and stained the whole piece. Once dry, I hammered in 8 nails on the front of the whole case, four on the top shelf and four on the middle.  This way we could hang medals from them.  To make sure it was secure, I screwed the whole unit into the wall studs in her room.  That thing isn’t going anywhere. 

This first picture is of the pallet I used for this project, the “before” pic if you like….


And this pic is of the final results.  My daughter loves it and there is plenty of space for future awards.  YAY!!!


Sorry about the window light.  That was the best angle I could get...so what's next in store for this handy woman?  I believe I will make a potting table from old wood pallets and scrap wood...hmmmm, that's what I'm going to do next...

Monday, March 26, 2012

DIY, how to make your front porch welcoming...

This past weekend, Stacy and I finished painting and decorating our front porch.  She is the one that makes everything beautiful and I am the one the makes it strong and sound.  Together we do a pretty darn good job.  I am putting too pics on here for the front porch because the front door is smack in the middle of the porch.  We went with a warm beachie cozy kind of theme. 

This pic is the right side of the porch from the door.  The big picture on the wall was the inspiration for colors and theme.  The color is someone what of burnt orange, almost like a sunset.  We have the andirondack chairs with a few knick knacks and such.  What you don't see is a sign right above doorway going into the house that is black with white lettering and says "Beach House".  There are white sheers on all the windows and the front of the porch is all windows and a door.  There are 3 windows on each side of the door and then 2 on each side of the porch.  The sheers gives it that summery beach house feel to it.

Here is the left side of the porch.  We have the boat shelving unit along with the palm tree and another beach tree.  The love seat has the blue and white striped sheet on it (mainly to protect it from dog and cat hair). The black hooks for coats and backpacks because it is a porch and is also treated as a small but neat mudroom.  Our pooch, Duchess, is very happy that we got this done because that is the only piece of furniture she is allowed on and she likes to watch traffic and people walking by. 

This front porch is welcoming because it is warm and inviting.  The warm bright colors to the serenity of being at a beach. 

Tuesday, March 20, 2012

DIY, how to make a teen girls bedroom into a hot pink and zebra haven.

So we moved into the house we live in November.  We have been doing some changes to it mainly with room color.  My daughter is 14 and her room was already painted hot pink with white trim.  Very bright.  I thought she was going to want us to change the color but she didn't.  She said she likes the hot pink and wanted to add zebra print to it. Well that's all she had to say. 

I wish I had taken some before pics of her room but I didn't.  I will try to describe what was done with each pic. 

I have 3 pics that I will have on  here to show my daughters room and what has been done. 

The first one is of the her vanity area.  In this little nook area, the walls were not painted but had panelling on them.  For now we will leave it that way.  This vanity was my Grandmother's dresser.  I sanded all old varnish off, cleaned, and re-stained with an Ebony color.  I also, took all off old hardware off and spray painted them metallic silver. Then there is a little throw rug, zebra print sheers on windows, and a vanity bench that was made from an old broken dining room chair.


As mentioned above, this vanity bench was made from an old broken dining room chair.  The back was cut off, seat was taken off and reupholstered with left over fabric from bed skirt.  I raised the seat by 2 inches by putting a 2" piece of scrap wood on seat frame.  Cut it to fit with a jig saw and and attached to leg frames.  Then I painted that scrap wood, sanded and stained legs and frame.  reattached the seat to the new piece added.  My daughter is a little taller so I had to raise the seat on it.

This next pic is of her bed area.  She had a twin size bed but wanted a full size.  We were given a full size mattress in excellent condition but had no frame.  So I built a platform for her.  I used 2 x 4's for the legs secured together to form a "L" shape.  2 x 6's for the frame and support beams and 3/4" plywood for the top.  Well that platform isn't going anywhere.  But it was an eyesore to look at it without a skirt.  With my daughter being a bit taller, the measures about 21" that is pretty high when a 12" mattress is added to it.  I would suggest most platform heights to be around 16".  With the platform being 21" I had a hard time finding a bed skirt to fit it and being cost effective.  A bedskirt that was bought would have ran me around $50....my reaction....hmmmm "NO." So I ordered some close out fabric and was able to make the skirt at a fraction of the price.  My daughter had picked out and purchased the sheet set and body pillow covers herself.  She also made the blanket.  It is a fleece tie blanket with hot pink on one side and zebra print on the other.  Again, we have the zebra sheer curtains, she even has a pair zebra slippers that are in the pic.  The items on the wall are some of her personal stuff.  Her cast from when she broke her wrist and her favorite poster.


There are a few more things we will need to do in here.  There is one area of the room that I have not shown you yet.  I will post that when I am finished with it.  But we are thinking about building a trophy/medal display out of a wood pallet.  We also need to strip, sand, and stain her chest of drawers.  So please stay tuned.

Monday, March 19, 2012

DIY, how to build a backyard fire pit using brick and river rock...

This pic is that of the fire pit we have in our backyard.  It is made of brick and river rock.  It is definitely not perfect but is perfect for our family.  Outdoors I love the perfection of imperfections.  With some fire pits, they are made and done absolutely beautifully and flawless.  I, however, love the not so perfect setting outside.  When I think of a fire pit, I think of a ring made out of whatever is found lying around and that can retain the fire.  This rock can either be found or bought.  Depends on where you live and if you know anybody that has some.  The brick helps from the high intense heat the fire can bring about.  It will crack if too hot so the brick helps with that.  We already had the rock and brick so I just started to layer the rocks around the brick. It is not secured or mudded together so you can change the look at any time if you want. 


Keep coming back for new posts.  I will add new posts as I complete new projects.